C-Bus/BACnet Gateway
Gateway Configuration
Before you can use the gateway, you need to configure some specific parameters. The configuration runs via a standard web browser.
Use the following parameters for the first login :
URL     :  http://192.168.1.222:8080
Username:  cbox
Password:  manager
After successful login, you need to perform some configuration tasks. Go through the preferences menu and update all the parameters that apply to your site. At the very least, you must check the gateway address and bus speed (baud rate) on the C-Bus to avoid address collisions and bus failures. And of course, you should change the default password!
Platform Settings
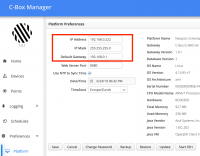
Go to the Preferences -> Platform menu and update the gateway platform properties according to your needs.
| Property | Description |
|---|---|
| IP Address | Gateway IP address |
| IP Mask | Gateway IP mask |
| Default Gateway | Default IP gateway |
| Web Server Port | IP port for the intergated web server |
| Use NTP to Sync Time | True if you are going to sync the local date and time from the internet |
| Date / Time | Current date and time. Readonly if NTP is on |
| Timezone | Timezone of the gateway |
| Commissioning | If true, only limited set of C-Bus interactions is available |
Save the changes with the Save button.
Commissioning checkbox switches the gateway between two modes. If true, the gateway does not activate the main polling loop and does not query for any C-Bus information like point values. In the commissioning mode, only the device and point learning are available actions on the C-Bus. You should not remove the flag commissioning until the gateway is fully set up. The setup includes the discovery of devices and data points, configuring their mapping to BACnet, including configuring attributes if you also plan to map them to BACnet.
C-Bus Settings
Go to Preferences -> C-Bus menu and update the gateway C-Bus properties according to your needs. The most important option is the gateway C-Bus address, that must be unique on the bus, and the C-Bus speed (baud rate). Additionally to the C-Bus options, you can later perform commissioning actions here. For more details about the action buttons, please see the chapter Utilities.
| Property | Description |
|---|---|
| C-Bus Name | Gateway name on the C-Bus |
| C-Bus Address | Gateway unique address on the C-Bus |
| C-Bus Baud Rate | C-Bus baud rate |
| Map C-Bus Attributes | Check if you are going to map additional point attributes |
| Device Point Prefix | Name prefix for BACnet objects monitoring the status of the C-Bus controllers. For more details see the section Device Points under Point Manager |
Save the changes with the Save button.
BACnet Settings
Go to the Preferences -> BACnet menu and update the BACnet server properties according to your needs.
| Property | Description |
|---|---|
| BACnet Device Name | BACnet device name |
| Bacnet Device Description | BACnet device descriptor |
| BACnet device ID | BACnet device ID on the BACnet network |
| BACnet Network Number | Number of the BACnet network |
| BACnet IP Address | Gateway IP address, readonly |
| BACnet Port | BACnet server IP port |
| BACnet Broadcast Address | BACnet broadcast IP address |
| BACnet Write Priority | Priority level for value write command (default 8) |
| BACnet Alarm Recipients | List of clients receiving C-Bus alarms |
Save the changes with the Save button.
The BACnet server IP address in the form is readonly, all other properties are writable. Changing the IP address in the Platform menu automatically updates the BACnet broadcast address as the latest address of the IP segment.
The gateway sends C-Bus alarms to the BACnet recipients as BACnet Alert Notifications. There is only one Alert Enrollment object in the gateway, and if no alarm recipient is defined, all alerts are sent as broadcasts. Add a list of recipients in the field BACnet Alarm Recipients to ensure the C-Bus alarms will reach all your clients. Add an alarm recipient in the form ipaddress:port, e.g. 192.168.130.17:47808.
Check the settings
Open the Home menu and check the status of the C-Bus and BACnet services. Assuming the C-Bus is physically connected, you should see the proper status of both components.


